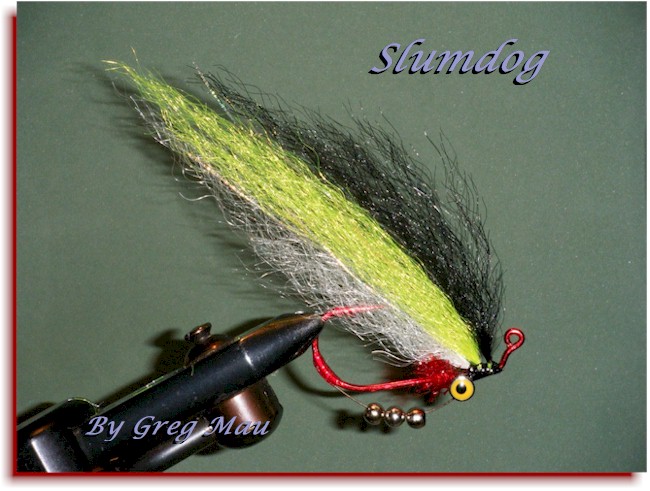
Slumdog by Greg Mau
Materials List
Hook: 3/0 jig 60 degree (original fly used red but other colors work too)
Thread: 3/0 (one color to match wing top and one to match hook)
Eyes: 7/32 barbell eyes (select eyes with a narrow space or a sharp “V” between the eyes over those with a long bar or a wide “U”).
Gills: red Ice/Chrystal/Cactus/Sparkle Chenille or schlappen
Slide Wire: .016″ diameter single-strand stainless leader (springy is preferred over easily formed wire)
Beads: 3/16 brass, lead, single bead chain bead, etc. (Start with a single bead chain bead between two heavier brass beads)
Wing: Flash N’ Slinky or Slinky Fiber… 1/3 bottom, 1/3 mid, 1/3 top colors (original fly was tied with White/Electric Yellow/Black)
Thread Coating: clear epoxy, head cement
INSTRUCTIONS:
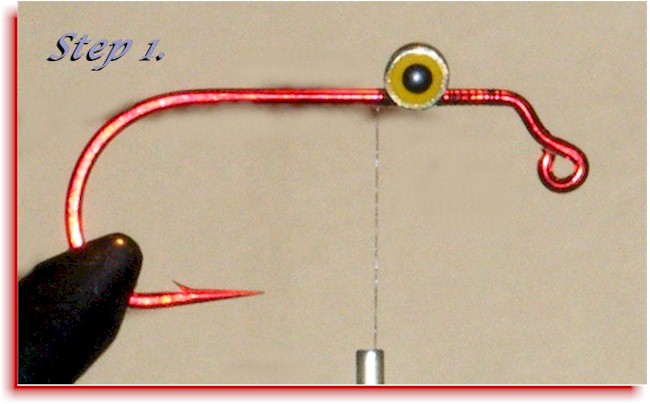
Step 1: Position hook in vise, shank up. Attach thread at the hook’s “jig bend” and wind rearward to the eye tie in point at approximately 1/3rd the shank length past the jig bend. Secure eyes taking care to use minimal thread wraps so that the front most rattle bead will strike the metal eyes vs. an excessive build up of thread.
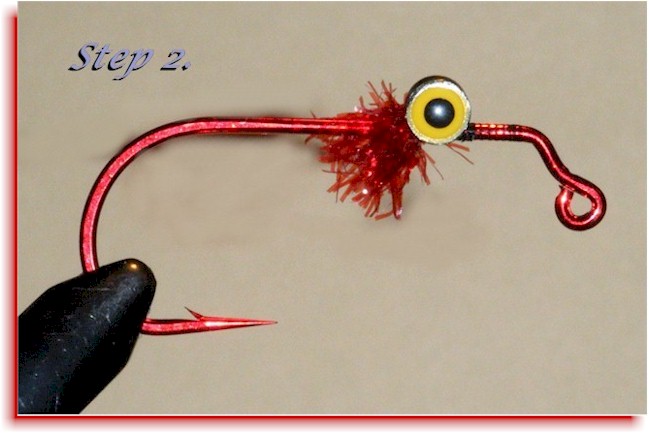
Step 2: Add three or four turns of red chenille or schlappen for gills behind the eyes. Trim gills along the top (side opposite of the hook bend) of the hook shank to clear a path for the beads to strike the eyes. Tie off thread in front of eyes.
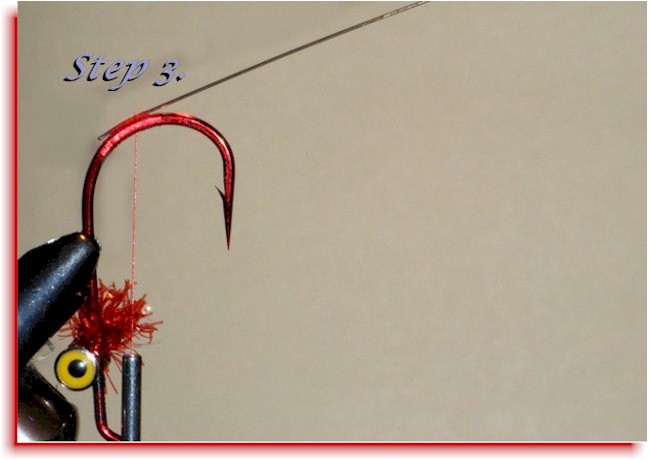
Step 3: Reposition hook in vise, shank vertical with hook bend up (jaws on the shank with hook eye down and hook point away from the jaws). Start thread at the top of the hook bend, lay a thread base layer to approximately half way to where the bend meets the shank and then back up a few turns. Remove the sharp edge/burr from one end of a 2″ length of the slide wire with either fine grit emery cloth or by rolling the end along a hard surface such as the flat of your scissors. This will reduce the chances of cutting your thread when wrapping over the bare wire end. Install wire with the deburred end against the outside of the hook bend and advance thread to where you think it appropriate to bend the wire. From there, wind your thread back towards the shank a few turns.
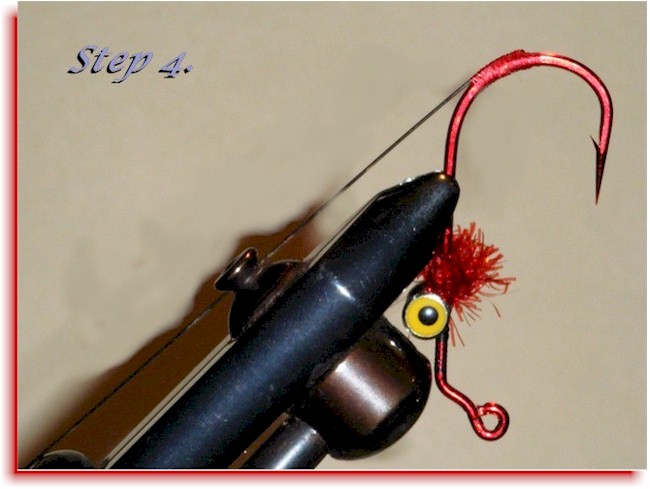
Step 4: Bend the wire along the outside of the hook bend and secure with a layer of thread towards the shank and another back towards and over the wire bend. Tie off thread with a whip finish. It’s OK for the short end of the wire to slide around under the thread windings. The goal is to have the main portion of the slide wire end up centered over the outside of the hook bend.
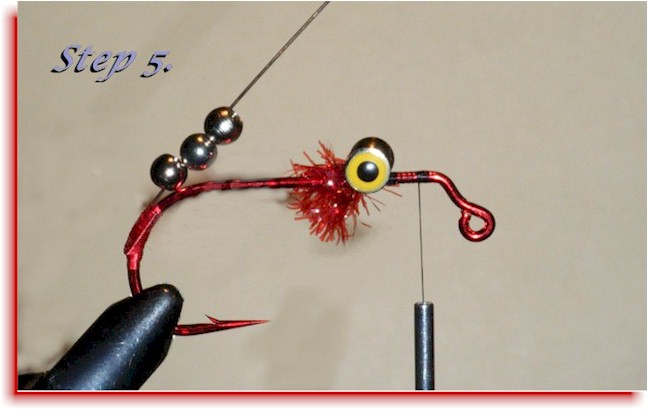
Step 5: Reposition hook in vise, shank up. Reattach thread midway between the eyes and the jig bend. Slide choice of beads on the slide wire.
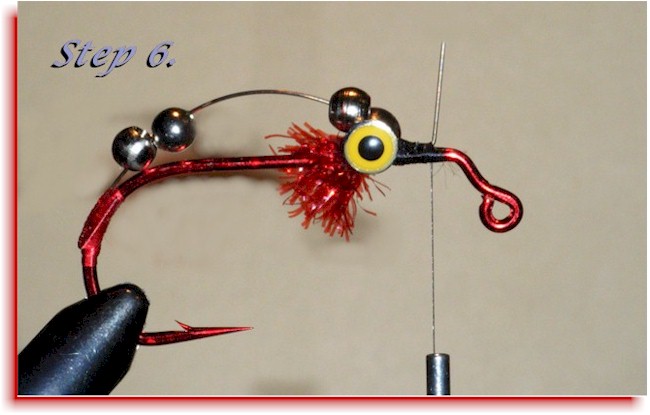
Step 6: Trap beads on wire between hook shank and eyes by pulling wire down into the “V” of the eyes and securing wire to shank in front of eyes with a few turns of thread. Adjust the wire loop length and shape to your liking before fully securing the by wrapping thread rearward towards the eyes and then back forward to just short of the tie in point. Bend the wire up to prepare it for trimming.
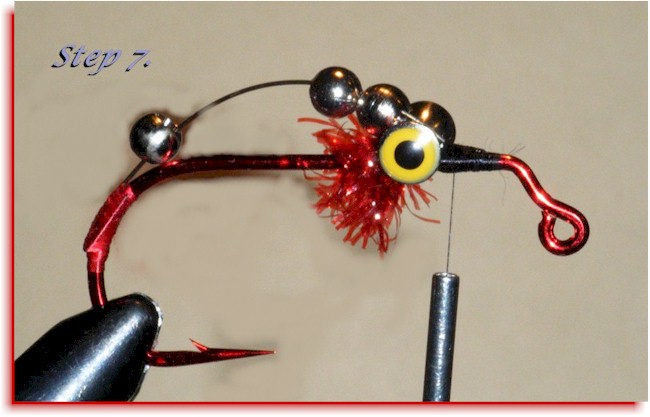
Step 7: Trim the wire to about 3/16″ long with a pair of tin snips (not your scissors!) and smooth the burr with the flat of the snips or your scissors. Finish bending the wire with your thumbnail and cover rearward towards the eyes with a layer of thread to secure. (If you’ve given in to the temptation of attaching the wire to the hook without the bends on BOTH ends, prepare to purchase your beads in bulk.)
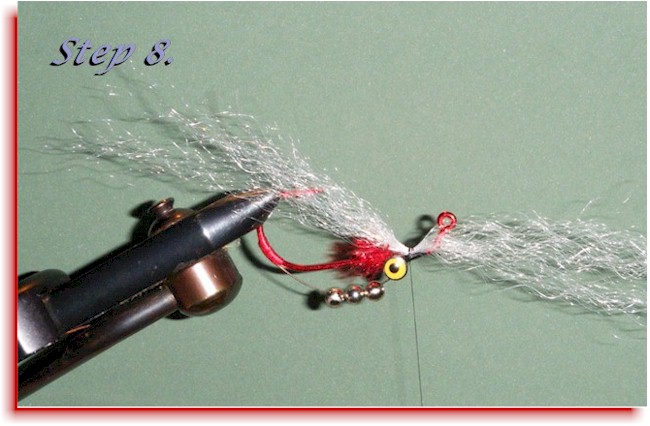
Step 8: Reposition hook in vise, shank down. Advance thread to the first/bottom wing tie in position at 1/3 the distance between the eyes and the jig bend. Hold a 3 and 1/2 hook shank length bunch of White Flash ‘N Slinky between your finger and thumb at approximately the mid point of the bunch. With your free hand, pinch and pull about 1/3 of the fibers from one end so that they are about a 1/2″ to 3/4″ longer than the rest. Roll the bunch of between your finger and thumb of your hold hand to mix the fibers. Then, again with the free hand, pull 1/3 of the mixed bunch another 1/2″ to 3/4″ further out. Mix again by rolling between the finger and thumb of your hold hand. This will put near identical tapers on both ends of the bunch. Position the bunch on top of the hook with approximately 40% of the entire length extending rearward towards the hook bend from the tie in point and approximately 60% extending forward over the hook eye. Secure with three or four turns of thread moving rearward.
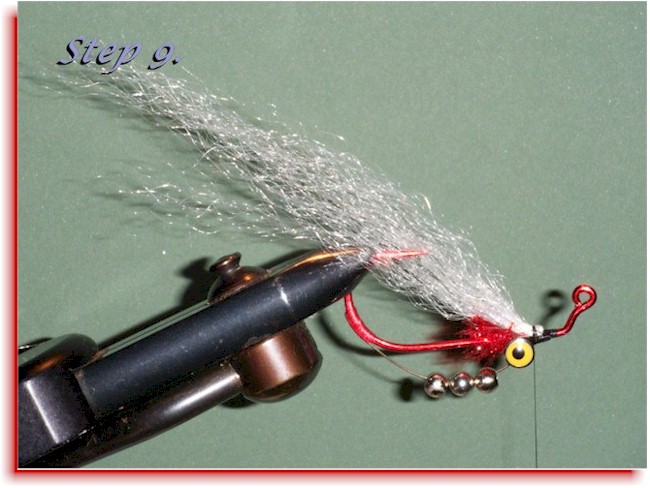
Step 9: Pull the forward pointing portion of the wing back over the rear portion and secure with three turns of thread.
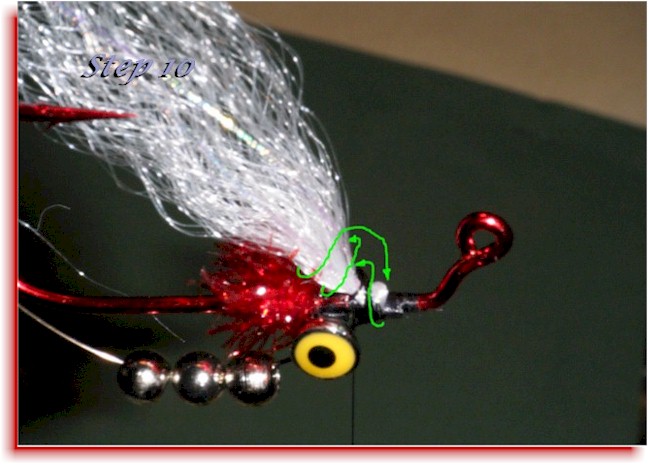
Step 10: Finish with a posting wrap (or two) around the entire bundle to keep all the fibers bunched together as well as positioned on top of the hook. (note: The thread ends up on the far side of the hook after crossing over on top of the bundle as shown by the arrows but is shown in the photo on the near side of the hook for clarity.)
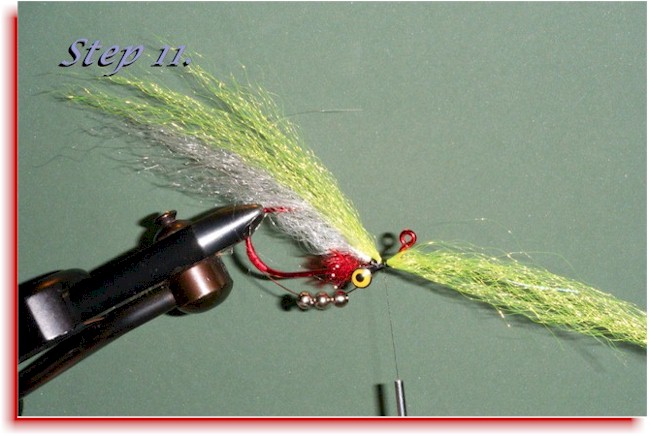
Step 11: Advance thread to the second/mid wing tie in position at 1/2 the distance between the bump caused by fold in the White fiber bundle and the jig bend. Take a 4 hook shank length of Electric Yellow (EY) Flash ‘N Slinky and repeat the pinch, pull, roll… pinch, pull, roll process to taper both ends as in Step 8. Position the bunch on top of the hook with approximately 50% of the entire length extending rearward towards the hook bend from the tie in point and approximately 50% extending forward over the hook eye. Secure with three or four turns of thread moving rearward.
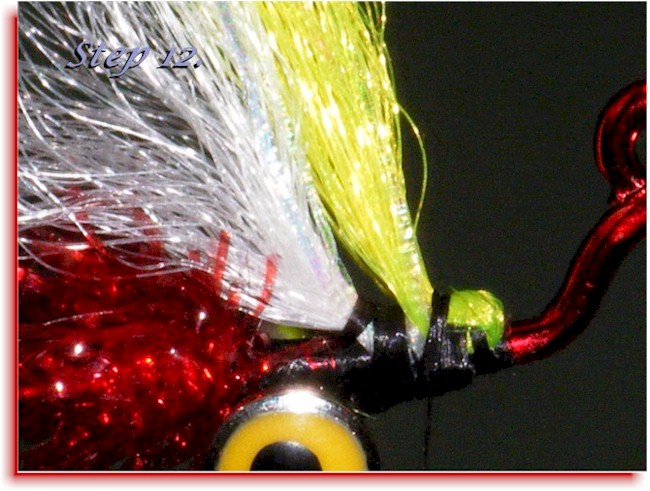
Step 12: Fold the forward portion of the EY bunch back over the rearward portion and continue wrapping thread until the fibers EY bundle tightly butts up against the bump from the previous White bundle. This will prop the EY bundle up.
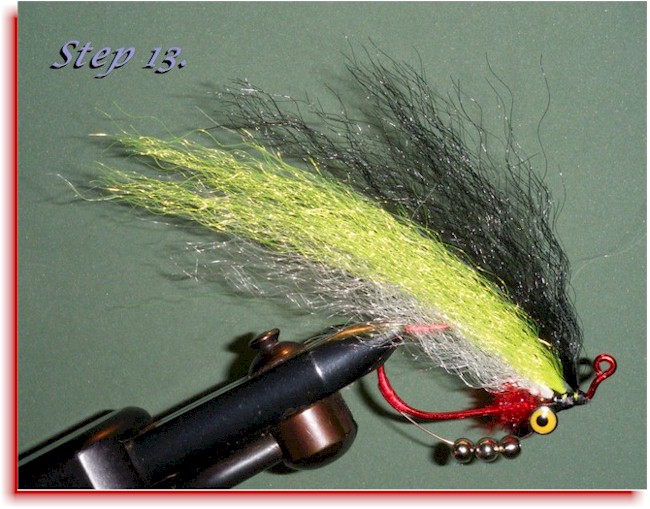
Step 13: Separate the EY from the White fibers with either a bodkin or the point of your scissors poked in the gap between the two bundles at the base. Finish the EY bundle with a posting wrap (or two) of thread around the entire bunch to keep all the EY fibers bundled together, separated from the White fibers, and positioned on top of the hook. Advance your thread to the third/top wing tie in position just behind the jig bend of the hook. Take a 3 and 1/2 hook shank length of Black Flash ‘N Slinky and repeat the pinch, pull, roll… pinch, pull, roll process to taper both ends again as in Sep 8. Position the bunch on top of the hook with approximately 60% of the length extending rearward towards the hook bend from the tie in point and 40% extending forward over the hook eye. Secure with three or four turns of thread moving rearward. As earlier, fold back the forward facing portion of the bundle, wrap to the EY nub, separate from the other fibers, and post wrap the bundle of black fibers.
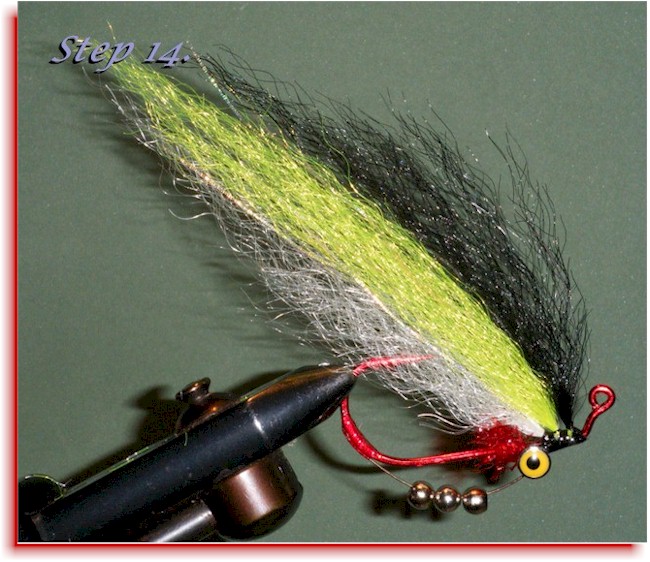
Step 14: Trim to shape as desired. Coat thread wraps on hook bend and from the eyes forward with only enough epoxy to make the wraps glossy. Keep the gaps between wing bundles open and epoxy free. A dab of head cement can be used in between the wing bundle to help stiffen them at the base if desired.

